Run a Local Voice + Vision AI Assistant on Jetson Orin Nano Using Gemma 4 — Complete Setup Guide
Learn how to run a fully local Vision-Language-Action AI assistant using Gemma 4 on a Jetson Orin Nano. No cloud, real-time, with voice input and webcam vision. Complete step-by-step guide with all commands.
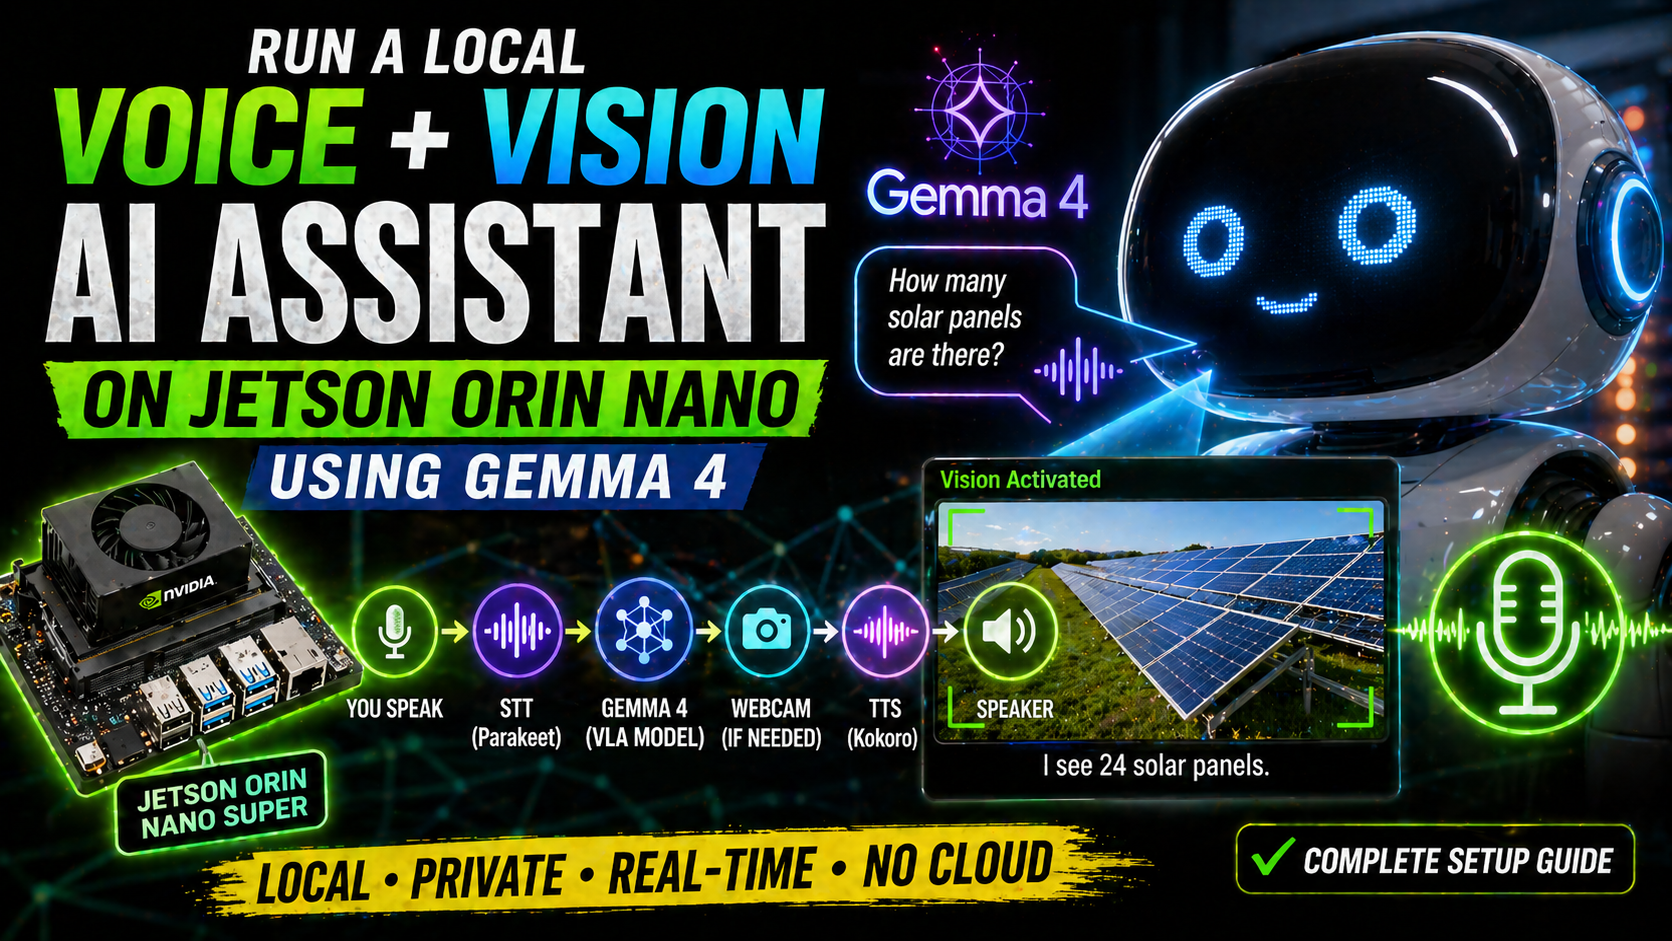
A fully local AI assistant that listens to your voice, thinks with Gemma 4, decides on its own when to look through the webcam, and speaks its answers back to you. No internet connection required after setup.
- Hardware: Jetson Orin Nano 8GB
- Model: Gemma 4 E2B (quantized)
- Capabilities: Voice input → AI reasoning → Vision when needed → Voice output
- Cloud dependency: None
You Can Now Run a Voice + Vision AI Assistant Locally — And It Decides When to Use the Camera on Its Own
The thing that makes this build genuinely interesting is not the voice capability or the vision capability on its own. It is that the model decides autonomously when to use the camera. You do not say "look at this" or trigger any camera mode manually. You just ask a question — and if the model determines that seeing would help it answer better, it calls a tool that captures a webcam frame and incorporates what it sees into its response.
This is what VLA — Vision-Language-Action — means in practice. The model reasons about which of its available capabilities to use, then uses them. It is a small but meaningful step toward AI systems that act rather than just respond.
And it runs entirely on a Jetson Orin Nano. No cloud. No API keys. No monthly fees. Real-time inference on hardware that fits in your hand.
Understanding the Pipeline
Before touching any commands, understand what is actually happening when the system runs:
You speak
    ↓
Speech-to-Text (STT) — converts your voice to text
    ↓
Gemma 4 — reasons about your question
    ↓
    ├── If vision is useful: captures webcam → analyzes → responds
    └── If vision not needed: responds directly
    ↓
Text-to-Speech (TTS) — converts response to audio
    ↓
Speaker output
The critical decision point is step 3 — Gemma 4 evaluating whether vision would help. This is handled through a tool-calling mechanism. The model has access to a tool called look_and_answer, and it calls that tool when it judges that visual information would improve its response. No hard rules, no keywords, no user triggers. The model makes the call.
Hardware Requirements
- Jetson Orin Nano 8GB — the 8GB variant is required; 4GB does not have enough RAM
- USB webcam — any standard UVC-compatible webcam works
- USB microphone — a dedicated USB mic gives better results
- USB speaker or headphones — for audio output
- Keyboard — for initial setup
- Internet connection — only needed during setup to download the model
Step 1: Get the Code
Clone the repository that contains the VLA demo script:
git clone https://github.com/asierarranz/Google_Gemma.git
cd Google_Gemma/Gemma4
If you prefer to download just the script without the full repository:
wget https://raw.githubusercontent.com/asierarranz/Google_Gemma/main/Gemma4/Gemma4_vla.py
Step 2: Install System Dependencies
Update your package list and install the required system packages:
sudo apt update
sudo apt install -y \
  git build-essential cmake curl wget pkg-config \
  python3-pip python3-venv python3-dev \
  alsa-utils pulseaudio-utils v4l-utils psmisc \
  ffmpeg libsndfile1
This step will take a few minutes. The most important packages are alsa-utils and v4l-utils, which you will need later to identify your microphone and webcam device identifiers.
Step 3: Set Up Python Environment
Create and activate a virtual environment, then install the required Python packages:
python3 -m venv .venv
source .venv/bin/activate
pip install --upgrade pip
pip install opencv-python-headless onnx_asr kokoro-onnx soundfile huggingface-hub numpy
What each package does:
- opencv-python-headless — webcam capture without display server dependency
- onnx_asr — speech-to-text conversion
- kokoro-onnx — text-to-speech synthesis
- soundfile — audio file reading and writing
- huggingface-hub — model downloading utilities
Step 4: Optimize RAM — Critical on Jetson
The Jetson Orin Nano 8GB has shared CPU and GPU memory. Create a swap file and free up RAM by stopping services you do not need:
Create an 8GB swap file:
sudo fallocate -l 8G /swapfile
sudo chmod 600 /swapfile
sudo mkswap /swapfile
sudo swapon /swapfile
Free up RAM by stopping non-essential services:
sudo systemctl stop docker 2>/dev/null || true
pkill -f gnome-software || true
free -h
After these steps you should see at least 4–5GB available memory plus 8GB swap. That is enough to load and run the quantized Gemma 4 model.
Step 5: Build llama.cpp With CUDA Support
You need to build llama.cpp from source with CUDA support to use the Jetson's GPU for acceleration:
git clone https://github.com/ggml-org/llama.cpp.git
cd llama.cpp

cmake -B build \
  -DGGML_CUDA=ON \
  -DCMAKE_CUDA_ARCHITECTURES="87" \
  -DGGML_NATIVE=ON \
  -DCMAKE_BUILD_TYPE=Release

cmake --build build --config Release -j4
This build will take 10–20 minutes on the Jetson. Use -j4 to limit parallel compilation — using more will exhaust RAM and fail. Be patient with this step.
Step 6: Download the Gemma 4 Model Files
You need two files — the main language model weights and the multimodal projection weights for vision:
mkdir -p ~/models && cd ~/models

wget -O gemma-4-E2B-it-Q4_K_M.gguf \
  https://huggingface.co/unsloth/gemma-4-E2B-it-GGUF/resolve/main/gemma-4-E2B-it-Q4_K_M.gguf

wget -O mmproj-gemma4-e2b-f16.gguf \
  https://huggingface.co/ggml-org/gemma-4-E2B-it-GGUF/resolve/main/mmproj-gemma4-e2b-f16.gguf
Step 7: Start the Model Server
Launch the llama-server with your downloaded model files:
~/llama.cpp/build/bin/llama-server \
  -m ~/models/gemma-4-E2B-it-Q4_K_M.gguf \
  --mmproj ~/models/mmproj-gemma4-e2b-f16.gguf \
  --host 0.0.0.0 --port 8080 \
  -ngl 99 \
  --flash-attn on \
  --jinja
What these flags do:
- -ngl 99 — offload 99 layers to GPU for maximum acceleration
- --flash-attn on — faster inference with less memory
- --jinja — enables tool calling support
- --host 0.0.0.0 — allows connections from other devices on your network
Wait for the server to finish loading — this takes 1–2 minutes. You will see a message when it is ready.
Step 8: Verify the Server Is Running
Open a new terminal and test the API:
curl http://localhost:8080/v1/chat/completions
You should receive a JSON response. If you get a connection refused error, the server is not yet ready — check the server terminal for error messages.
Step 9: Identify Your Audio and Camera Devices
Find the device identifiers for your microphone, speaker, and webcam:
arecord -l
pactl list short sinks
v4l2-ctl --list-devices
From arecord -l output — find your USB microphone card and device number. For example card 3, device 0 gives you plughw:3,0.
From pactl list short sinks — copy the full sink name for your speaker.
From v4l2-ctl --list-devices — note your webcam device number, typically 0.
Step 10: Run the Assistant
Activate your virtual environment and run the main script with your device identifiers:
source .venv/bin/activate

export MIC_DEVICE="plughw:3,0"
export SPK_DEVICE="alsa_output.usb-YourDevice.analog-stereo"
export WEBCAM=0
export VOICE="af_jessica"

python3 Gemma4_vla.py
For text-only mode without microphone:
python3 Gemma4_vla.py --text
How the Vision Tool Works
The model autonomously decides when to use the camera through tool calling. The tool is defined like this:
{
  "name": "look_and_answer",
  "description": "Take a photo with webcam and analyze what is visible.",
  "parameters": {
    "type": "object",
    "properties": {
      "question": {
        "type": "string",
        "description": "The question to answer about what the camera sees"
      }
    },
    "required": ["question"]
  }
}
When the model receives your question, it reasons about whether calling this tool would help. If you ask something visual — identifying an object, reading text in the environment, describing what is present — the model generates a tool call. The Python script intercepts this, captures a webcam frame, sends it back to the model, and gets a final response. No user trigger needed. The model decides.
Docker Alternative
If you prefer not to build llama.cpp from source, use the NVIDIA Docker image:
sudo docker run -it --rm \
  --runtime=nvidia \
  --network host \
  ghcr.io/nvidia-ai-iot/llama_cpp \
  llama-server -hf unsloth/gemma-4-E2B-it-GGUF:Q4_K_S
Troubleshooting
- Out of memory / server crashes — Switch to Q3_K_M quantization. Verify swap is active with free -h.
- No sound or mic not working — Run arecord -l and pactl list again. Device names are case-sensitive and must match exactly.
- First response is slow — This is normal. Caches warm up on first inference. Subsequent responses will be faster.
- Webcam not found — Run v4l2-ctl --list-devices and update your WEBCAM environment variable to match the actual device number.
The Bigger Picture
Step back and think about what this system does. It listens to natural speech. It understands meaning. It reasons about whether visual information from the physical environment would help it respond better. It captures and interprets images when appropriate. It speaks its response aloud. All locally, in real time, on a device that costs a few hundred dollars.
A year ago this required cloud connectivity, API keys, and ongoing subscription costs. Today it runs on a device you own, disconnected from the internet, with no ongoing costs and no data leaving your local network.
This is not a demo of what will be possible eventually. It is a working demonstration of what is possible right now.
⚡ Quick Reference — All Commands in Order
# 1. Get code
git clone https://github.com/asierarranz/Google_Gemma.git
cd Google_Gemma/Gemma4

# 2. System dependencies
sudo apt update
sudo apt install -y git build-essential cmake curl wget \
  pkg-config python3-pip python3-venv python3-dev \
  alsa-utils pulseaudio-utils v4l-utils psmisc ffmpeg libsndfile1

# 3. Python environment
python3 -m venv .venv
source .venv/bin/activate
pip install --upgrade pip
pip install opencv-python-headless onnx_asr kokoro-onnx soundfile huggingface-hub numpy

# 4. Swap and RAM
sudo fallocate -l 8G /swapfile
sudo chmod 600 /swapfile
sudo mkswap /swapfile
sudo swapon /swapfile
sudo systemctl stop docker 2>/dev/null || true

# 5. Build llama.cpp
git clone https://github.com/ggml-org/llama.cpp.git
cd llama.cpp
cmake -B build -DGGML_CUDA=ON -DCMAKE_CUDA_ARCHITECTURES="87" \
  -DGGML_NATIVE=ON -DCMAKE_BUILD_TYPE=Release
cmake --build build --config Release -j4

# 6. Download models
mkdir -p ~/models && cd ~/models
wget -O gemma-4-E2B-it-Q4_K_M.gguf \
  https://huggingface.co/unsloth/gemma-4-E2B-it-GGUF/resolve/main/gemma-4-E2B-it-Q4_K_M.gguf
wget -O mmproj-gemma4-e2b-f16.gguf \
  https://huggingface.co/ggml-org/gemma-4-E2B-it-GGUF/resolve/main/mmproj-gemma4-e2b-f16.gguf

# 7. Start server
~/llama.cpp/build/bin/llama-server \
  -m ~/models/gemma-4-E2B-it-Q4_K_M.gguf \
  --mmproj ~/models/mmproj-gemma4-e2b-f16.gguf \
  --host 0.0.0.0 --port 8080 \
  -ngl 99 --flash-attn on --jinja

# 8. Identify devices (new terminal)
arecord -l
pactl list short sinks
v4l2-ctl --list-devices

# 9. Run assistant
source .venv/bin/activate
export MIC_DEVICE="plughw:3,0"
export SPK_DEVICE="your_speaker_sink"
export WEBCAM=0
export VOICE="af_jessica"
python3 Gemma4_vla.py